> For the complete documentation index, see [llms.txt](https://docs.rillet.com/EjmEP4KZ9BVp9j2ho4Mh/llms.txt). Markdown versions of documentation pages are available by appending `.md` to page URLs; this page is available as [Markdown](https://docs.rillet.com/EjmEP4KZ9BVp9j2ho4Mh/accounts-receivable/products/create-a-new-product.md).
# Create a New Product
Products in **Rillet** represent what you sell, whether it is a SaaS tool or a professional service. Each product record holds the details **Rillet** uses to bill your customers and recognize revenue, such as its revenue type, revenue account, and pricing. You create and manage products in **Accounts Receivable**, and you can edit, delete, deactivate, or reactivate them as needed.
### **Set Up a Product Record**
Follow these steps to create a new product:
1. Go to **Accounts Receivable > Products.**
2. Select **+** **Add Product**.
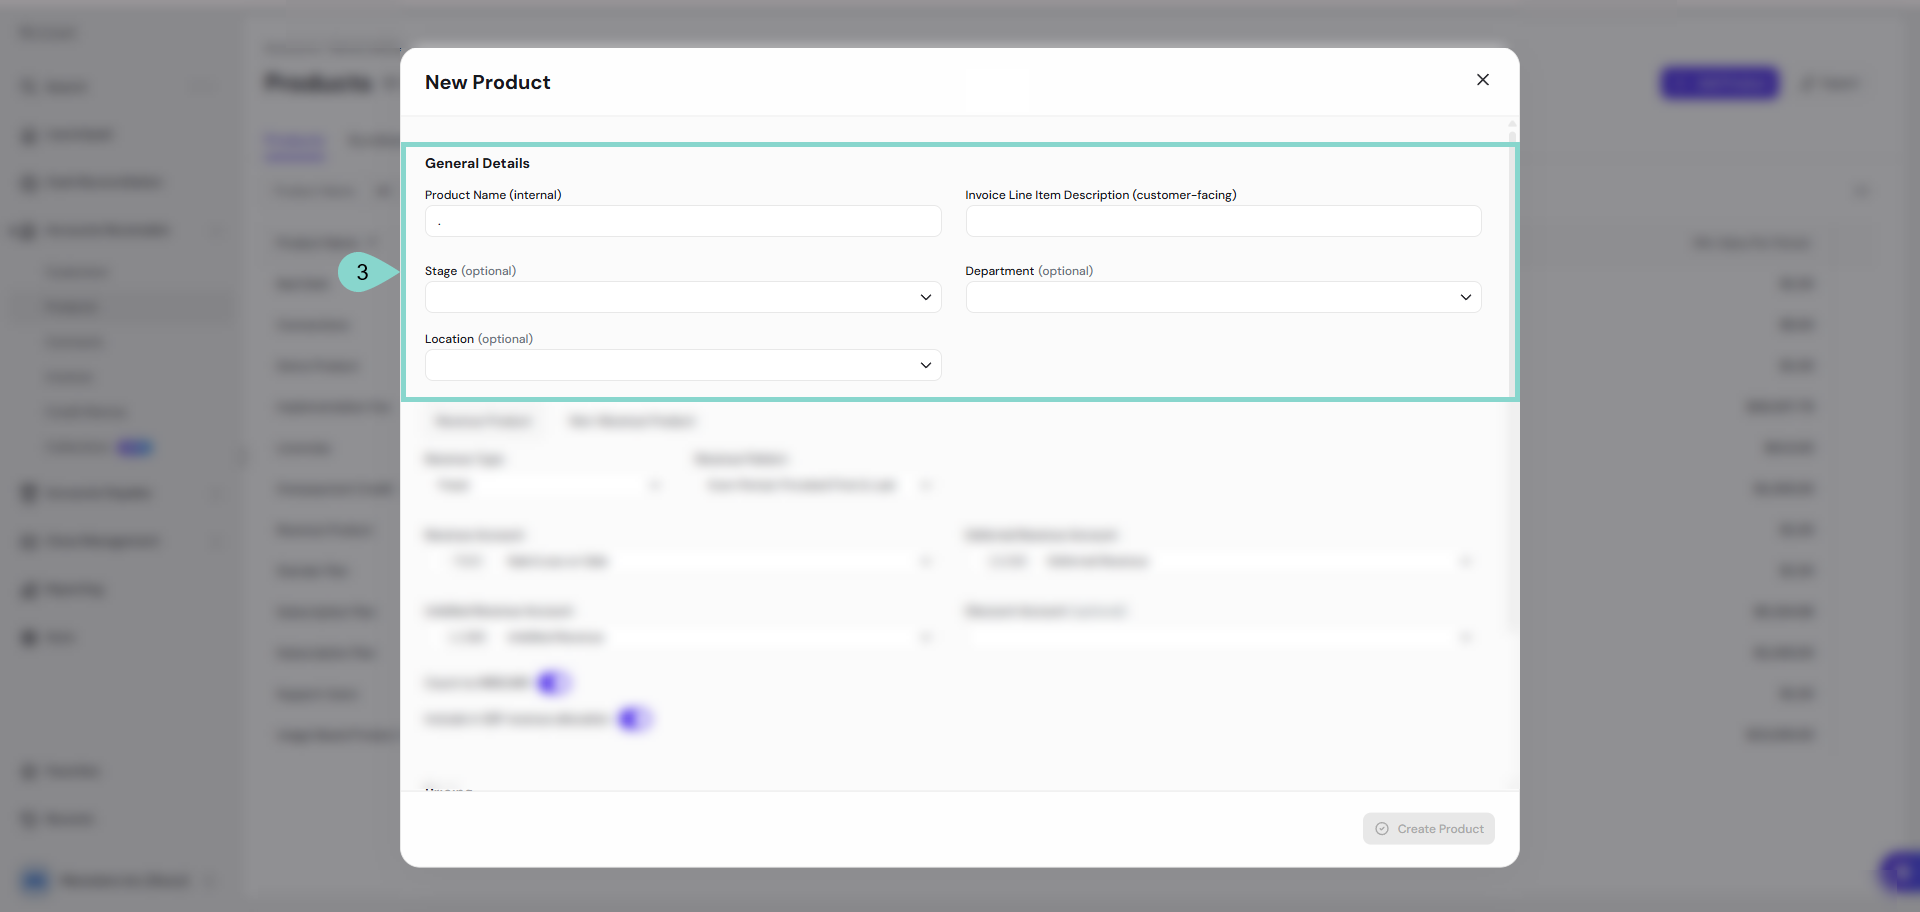
3. Enter the **General Details** of the product:
* **Product Name (internal):** Enter the name Rillet displays for this product internally.
* **Invoice Line Item Description (customer-facing):** Enter the description that appears whenever a customer is invoiced for this product, which you can still override on each contract as needed.
* **Stage (optional), Department (optional), and Location (optional):** Select a value from each list to assign it to the product.
4. Select **Revenue Product** or **Non-Revenue Product**.
* **Revenue Product:** Most products, from a SaaS tool to a professional service, are revenue products.
* **Non-Revenue Product:** A product that does not return a profit, such as a billable expense, is a non-revenue product.
5. For a **Revenue Product**, fill in the revenue fields:
* **Revenue Type:** Choose **Fixed** if you charge customers a flat rate for the product, or **Usage** if you charge a variable rate based on future consumption.
* **Revenue Pattern:** Choose **Even Period, Prorated First & Last** or **Daily** to set how frequently Rillet recognizes revenue.
* **Revenue Account:** Select the GL Account Rillet uses when it recognizes revenue for this product.
* **Deferred Revenue Account:** Select the GL Account that holds deferred revenue for this product. Rillet pre-fills your organization's default, and the list shows only accounts with the **Deferred Revenue** subtype.
* **Unbilled Revenue Account:** Select the GL Account that holds unbilled revenue for this product. Rillet pre-fills your organization's default, and the list shows only accounts with the **Unbilled Revenue** subtype.
* **Discount Account (optional):** Select a separate account if you want to record discount contra revenue apart from Revenue. If you leave it blank, Rillet records net revenue to the Revenue Account. If you select one, Rillet records gross revenue to the Revenue Account and discount contra revenue to the Discount Account.
* **Count to MRR/ARR:** Toggle this option on or off as needed.
* **Include in SSP revenue allocation:** Toggle this option on or off as needed.
6. For a **Non-Revenue Product**, fill in the fields that replace them:
* **Type:** Rillet shows **Fixed** here.
* **Account:** Select the GL Account for this product.
* **Deferred Account:** Select the deferred GL Account for this product.
* **Include in SSP revenue allocation:** Toggle this option on or off as needed.
7. Under **Pricing**, choose **Recurring** or **One-time**, then fill in the pricing fields:
* **Currency:** Select the currency of the product.
* **Default Price (per Period) (optional):** Enter the default price, such as 1.00. For a **One-time** product this field is labeled **Default Price (optional)**.
8. Click **Create Product**.
Rillet creates the product and adds it to the **Products** list, where you can update it later as described in [**Managing Products**](#undefined) below.
### **Managing Products**
Once a product is created, you can edit, delete, deactivate, or reactivate it as needed.
#### **Edit an Existing Product**
Use these steps to update a product's details, such as pricing, description, or revenue settings:
1. Click on the **three dots** (•••) located at the end of the product’s row.
2. Select **Edit Product** from the dropdown menu.
3. Modify the **Product Details**.
4. Click the **Save Product** button.
#### **Delete a Product**
Complete these steps to delete a product that is no longer needed and has not been used in transactions:
1. Click on the **three dots** (•••) located at the end of the product’s row.
2. Select **Delete Product** from the dropdown menu.
3. Click **Delete** to confirm or **Cancel** if you do not wish to proceed.
Products can only be deleted if they have not been used on a contract or invoice.
#### **Deactivate a Product**
Take these steps to deactivate a product that should no longer be used in new transactions:
1. Click on the **three dots** (•••) located at the end of the product’s row.
2. Select **Deactivate Product** from the dropdown menu.
3. Click **Deactivate** to confirm or **Cancel** if you do not wish to proceed.
{% hint style="info" %} **Note:**
Deactivating a product does not stop invoices and contracts from syncing with it, it only prevents the product from being used in new transactions. Deactivated products can be reactivated later unless they have been permanently deleted.
{% endhint %}
Rillet deactivates the product once you confirm.
### Frequently Asked Questions (FAQ)
Does Rillet support percentage-of-completion revenue recognition?
Rillet does not offer a percentage-of-completion option. When you create a revenue product, **Revenue Type** lets you choose only **Fixed** or **Usage**, and **Revenue Pattern** lets you choose only **Even Period, Prorated First & Last** or **Daily**.
### **See Also**
To learn more about setting up products and customers for invoicing in **Rillet**, review these articles:
* [**Add a New Customer to Rillet**](/EjmEP4KZ9BVp9j2ho4Mh/accounts-receivable/customers.md)
* [**Create a New Invoice**](/EjmEP4KZ9BVp9j2ho4Mh/accounts-receivable/invoicing-and-payments/create-a-new-invoice.md)
* [**Add Billing Periods to Invoices**](/EjmEP4KZ9BVp9j2ho4Mh/accounts-receivable/invoicing-and-payments/add-billing-periods-to-invoices.md)
---
# Agent Instructions
This documentation is published with GitBook. GitBook is the documentation platform designed so that both humans and AI agents can read, navigate, and reason over technical content effectively. Learn more at gitbook.com.
## Querying This Documentation
If you need additional information that is not directly available in this page, you can query the documentation dynamically by asking a question.
Perform an HTTP GET request on the following URL with the `ask` and `goal` query parameters:
```
GET https://docs.rillet.com/EjmEP4KZ9BVp9j2ho4Mh/accounts-receivable/products/create-a-new-product.md?ask=&goal=
```
`ask` is the immediate question: it should be specific, self-contained, and written in natural language.
`goal` is what the user is ultimately trying to achieve, the reason they need the answer. Sharing it helps GitBook give you a better, more relevant answer. A goal is most helpful when it describes the outcome the user wants rather than restating the question. For example, with `ask=how do I create an API token`, a goal like `build a script that syncs our docs to a CMS` lets GitBook tailor the answer to that use case.
The response will contain a direct answer to the question and relevant excerpts and sources from the documentation.
Use this mechanism when the answer is not explicitly present in the current page, you need clarification or additional context, or you want to retrieve related documentation sections.